After playing with augmented reality for flash, I acquired some experience with the technology. Back in January of 2012 I was asked if it was possible to run an augmented reality game on a mobile device. I was skeptical back then, since my experience in flash showed that the image processing was very CPU intensive and could be impossible with the current mobile chips. For my surprise, Qualcomm already had a Unity3D plugin for iOS, that later on became to be known as Vuforia. I did some tests and voilà! it was running really smooth on my iPhone 4. The project sudden became viable in a matter of hours! Kudos for Qualcomm! Amazing lib.
We already knew that the game was going to be soccer related, but everything else was undefined. The first challenge was: how the user is going to use augmented reality in a soccer game? We had two scenarios:
- The image marker would be parallel to the ground, the most common use for AR apps;
- The image marker would be perpendicular to the ground;
After a couple tests we decided to choose the latter approach since the game was focusing in a penalties-like interaction rather than a full-sized field game. The idea was to place the marker just behind the goal, so the user could easily position the camera in the best angle.
The first marker version was just a promo image of the game with logos and some game images. We then realized that was awkward to try adjust the camera when you have no idea where the marker is inside the virtual world shown by the iPhone. A good idea rapidly emerged: We could use part of the stadium as the marker image itself. This idea allowed the marker to exist in both worlds, perfect!
After some iterations, the image marker became this:

Image marker for 3D Fun n’Goals
As I said, it demanded some iterations to reach the “5-star augmentable” rating for the image. This rating is provided by the Target Manager system in the Vuforia Developer portal. This rating is based on the number of “features” of the image. A feature is defined as a sharp, spiked, chiseled detail in the image. More about features can be found here. The analyzed output of our image marker is this:
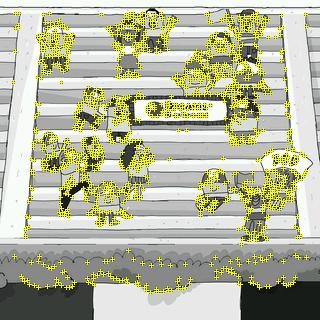
All the features in the marker.
Pretty good amount of features. Those iterations proved to be really important for stability since lower rating images would cause some flickering in the virtual world.
The image marker inside the game:
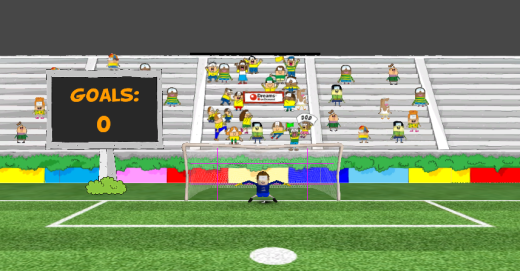
Print screen directly from Unity3D
I’ll write more about the other aspects of the game in future posts. Meanwhile, please try the game and tell me what you think, it’s free!
If you had experiences with augmented reality, please share in the comments 😉